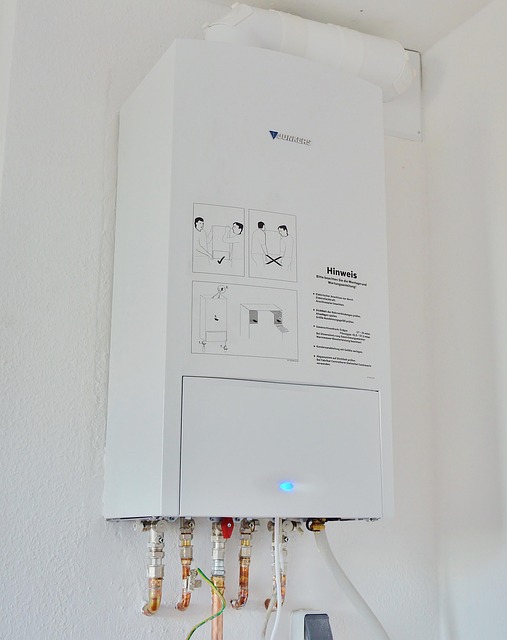
Water heater flushing, recommended every 3-6 months, prevents sediment buildup in hard water tanks, improving efficiency, energy savings, and lifespan. Prepare with essential tools, turn off power and cold inlet, connect a hose to the drain valve, and gather debris. Perform maintenance by turning off cold supply, venting tank, opening hot taps, flushing with alternating hot and cold, and rinsing with clear cold water until flow is clean.
Water heater flushing is an essential aspect of water heater maintenance, ensuring optimal performance and longevity. This process involves removing sediment buildup, improving efficiency, and preventing potential issues like rust or leakages. Understanding when to flush—typically every 3-6 months—is crucial for avoiding costly repairs. This article guides you through the why and how of effective water heater flushing, empowering you to maintain a vital household appliance.
- Understanding Water Heater Flushing: The Why and When
- Essential Tools and Preparation for Effective Flushing
- Step-by-Step Guide to Proper Water Heater Flushing
Understanding Water Heater Flushing: The Why and When
Water heater flushing is an essential aspect of water heater maintenance, ensuring optimal performance and longevity. It involves removing sediment buildup from within the tank, which can cause efficiency issues and even failure over time. Sediment accumulation is a natural result of hard water, where minerals and magnesium dissolve into the water supply, leaving behind residue as it heats up.
Regular flushing, typically recommended every 3-6 months, helps prevent these deposits from accumulating, ensuring your water heater functions efficiently. This practice is particularly important in regions with hard water, where sediment buildup can occur more rapidly, potentially leading to reduced hot water output and increased energy bills. By understanding the importance of water heater flushing and incorporating it into your routine maintenance schedule, you’ll contribute to the overall health and longevity of this vital home appliance.
Essential Tools and Preparation for Effective Flushing

Before beginning the flushing process, ensure you have the necessary tools on hand, as this will make the task smoother and more efficient. You’ll need a garden hose, either connected to a water source or ready for connection, along with a few other basic items like a bucket, rags, gloves, and safety goggles. These tools are essential for protecting yourself from any potential splashes or leaks during the flushing process.
Preparation is key; turn off the water heater’s power supply and cold water inlet to prevent any accidents. Once ready, connect your garden hose to the water heater’s drain valve, which will allow you to safely and effectively flush out any sediment buildup. Having a bucket nearby will help catch any debris or rust that comes out during flushing, making clean-up easier afterward.
Step-by-Step Guide to Proper Water Heater Flushing
Proper water heater flushing is a crucial part of regular water heater maintenance. By removing mineral deposits and sediment buildup, it ensures your water heater operates efficiently and prolongs its lifespan. Here’s a step-by-step guide to doing it right.
1. Turn Off the Water Heater: Before beginning, shut off the cold water supply valve located at the base of the tank. This prevents any unexpected hot water discharge during the flushing process.
2. Vent the Tank: Open both the hot and cold water outlets attached to your heater. These are usually located on top or at the bottom of the tank. Venting allows air to enter the system, which is necessary for proper flushing.
3. Flush the System: Turn on the hot water tap farthest from the heater first. Do this slowly to prevent excessive pressure buildup. As the hot water runs, open another hot water tap near the heater to facilitate the flushing process. Allow the water to flow until you see a significant decrease in sediment at the bottom of the tank.
4. Flush Cold Water: Once the hot water has reduced sediment, turn on both cold water taps fully. The combination of cold and hot water will help flush out any remaining debris. Keep the taps open for several minutes to ensure thorough cleaning.
5. Rinse and Repeat: After flushing, close all taps and turn on the cold water supply valve. Let fresh cold water flow through the heater for a few minutes to rinse out any residual particles. You may need to repeat this process several times until the water runs clear.
Proper water heater flushing is a vital aspect of regular water heater maintenance, ensuring optimal performance and longevity. By understanding the importance and following a systematic approach, homeowners can easily navigate this process and avoid potential issues. Remember, a well-maintained water heater contributes to energy efficiency and provides consistent hot water supply, making it a simple yet significant task for any DIY enthusiast.